Welcome back to my home renovation: the finale. It took me longer than expected to write the update because we just finished the house a few weeks ago (not in a month as predicted on my last blog post -oh the life of renovation-when you hear one month add 2 more to be safe). But we finally finished it! It looks amazing!!!
I will keep this post brief, so we can get to the before and after photos. But let me fill you in on what went down these past couple of months. There were so many things that needed to be done that just took time like installing the doors and trim, painting the doors, waiting for our countertops to arrive (which were delayed 2 weeks), painting the interior walls and more. Plus my husband was busy with his actual job (as a contractor), which also delayed our home project.

My Home Renovation Is Coming Together
Overall, the house was coming together slowly but surly and we took it day by day (my dad never stopped though, he was at the house daily plugging away at some task that needed to be done).
We were getting really excited with how the house looked. We were in love! There were some projects that were a mission to get done, such as the arch over the bar/kitchenette, our laundry barn door and our secret room door (which leads to wine room/speakeasy).
Those missions took time calling place after place to find businesses with the right machines to help cut the barn door and arch as well as calling around to find the right materials. But they finally got done and looked absolutely incredible.
We were getting worried that we would either have to give up on some of the ideas or tweak the ideas to get it done. But my husband made it happen (like always).

Cleaning Up and Final Touches
As the house was finally coming together, the biggest job (and most time consuming) was cleaning up. The house was a disaster, from tools on all floors plus in the garage and outside. The excess materials started to accumulate and I kept trying to clean and move items to one space and throw out the things that were not needed but it wouldn’t stay that way for very long. And if you know anything about construction site, a messy site is a delayed project (so it was important to get the cleaning done).
But finally I got some help and it was getting cleaner and cleaner by the day. When it was finally all cleaned up, we were ready for the paint and all the final touches.
Speaking of final touches, it was pretty easy to get carried away with adding some fun design to our house because we wanted the best for our home.
We added extra lights to the rec room bar/kitchenette arch. We added some wall paneling throughout the house. I made the decision to paint the wine room and secret door black (it was hard to see the vision for some but they loved it by the end). I put up some wallpaper in the second pantry as well as in my linen closet. I also added some wall decals to the mudroom. It’s hard for me to just be simple, my creativity was buzzing and bonus this was my house so I could do what I want.

Loved It and Listed It
But as time was moving along and my husband was getting busier at work, which was an hour and half from the house we were working on. He started to really feel the strain of travelling the distance. He wanted to brush it off and think it would get easier. But as the pandemic was getting less severe and lockdowns were lifted and people were traveling back on the roads, the traffic was just getting worse and worse.
So we finally had to have the talk. He wanted to sell the house, as it wasn’t helping him to create any work-life balance. He loved the house, the area and that we were so close to my parents but it just wasn’t feeling like the right move for him at this time anymore. I love the house and we poured our heart and souls into it but I can honour his feelings and know that this just isn’t the right thing for us at this time.
So we made the difficult decision to get it fully finished, to sell it. I just kept saying “it is what it is” and then moved into the thought process of we are creating a beautiful home for an amazing family to love and live for a long, long time.
We are leaving a piece of ourselves in the house (with the designs and work) and it’s cool to think that whenever we drive past the street we made a difference there and an impact and got to create a home for family to enjoy. That is special and I will take that prize (since I can’t keep the house for myself).

Home Renovation Budjet, What Budjet?
So now with that decision made, we needed to realize that the scope of the project has to change and we need to focus on the budget more, so that we don’t overspend, if we plan to sell.
We did pretty well sticking to our budget in the first place, but with the additions like heated floors for all bathrooms, upgraded tech throughout the home (the whole house is basically connected to Google assistant), adding some new things to our outdoor landscape, we started to notice that things were adding up pretty quickly.
We ended up going over budget by about $40,000 which I guess is pretty good from what I hear, especially for the fact that we are now selling a luxury home.

Ready For The Stage
The other thing that did affect our budget, a little bit more, was staging. I knew that it if we are planning to sell this house, it is important to have it properly staged.
I considered doing it myself, but I was still finishing up a lot of other things on our list and I didn’t want to be overwhelmed and rushed (plus I don’t think I could do it alone).
Often staging companies have their own inventory or rent it and they have 2-3 people working on a home. That would be a bit much for me to do especially since I have never done it before and I would be doing it alone.
I decided I would stage a couple rooms myself and hire out the rest of the house to a company. Oh boy did that take some time! I spoke with my real estate agent about stagers that she has used in the past and asked her to reach out to them and get quotes.
I also began searching for a company who had the style I was looking for, especially for this house. Remember it was going to be my house, so it makes sense I was going to be picky about what furniture would be in the home.
Finally after a week of many emails, my first pick for stager was actually available (due to a cancellation in her schedule-Thank God) and she was close to my budget (I added some items which did push me over budget). She was booked and I couldn’t wait to see the house become a home.

House to a Home
It was such a dream working with a staging company, I would absolutely recommend it!
The first visit, after a few emails with photos being sent, was like what I see on TV. I got to go through the house and tell her what I was envisioning for the space. I was very specific with colours and items I wanted (I hope that the fact that I knew what I was looking for helped her with her selections).
She had some great suggestions to add and tweaked some of my plans and it just worked out fabulously! When staging day arrived, I couldn’t have been happier.
My house has officially become a home and it looked freakin’ incredible! I was so proud of everything we did. We transformed an old home to a beautiful, updated, lux home, in which we were going to pass along to another family to love.

Final Thoughts
This was an awesome experience, one I had dreamed of for a long time. If I could make this a career I would. I would just need my husband to be on board plus I would have to not get attached to the next house (granted it wouldn’t be our home intially, so that would make it easier).
With the house done and now sold (yes, sold it was a fast process, the house is gorgeous and didn’t last long on the market), it’s now time to decompress, chill out and enjoy the summer.
I would like to say a big thank you to my realtor for all her help. She is such a gem! Also my husband and parents are incredible for their non-stop work. All our trades and the people who helped me in all the tile shops or hardware stores are amazing! And of course, the stagers were absolute sweethearts and gifted at what they do. Thank you for making my creation come to life!
But before I go, here are the before and afters you have been waiting for (I will add some descriptions / commentary below).
I hope you enjoy the home’s transformation as much as we did creating it.
Thanks for the love, I really do appreciate it!
Talk soon,
Alexandra
MY HOME RENOVATION: BEFORE AND AFTER

The porch was one of my favorite areas. We actually used the siding that was inside the covered porch to cover a window that we removed in the kitchen (to get more cabinets). So we added a wood feature in a cool pattern (that we pulled up to the ceiling as well). I also added a fun tile, the hello sign on the wall, a cute mailbox and plants to make the entrace of this home a total moment.

Front Foyer. What a difference a glass door can make on the light in the space!! The fresh chevron tile and all white panelled walls helps create a fresh, elevated entry.

Foyer. Changing the front door to a sandblasted glass door was a good call. It added so much light and made the space feel bigger.

Looking up to the main floor. So many things to take in here: the fresh stairs done in wood, the modern railings, the wood slat dividers, the floor to ceiling wall panelling, the open space above, the vaulted ceiling, THAT kitchen (which you will see more of in a moment).

Major transformation! Now you can really see the slat wall divider-stunning!!

The view looking down to the foyer from the main level. Such a fresh update!

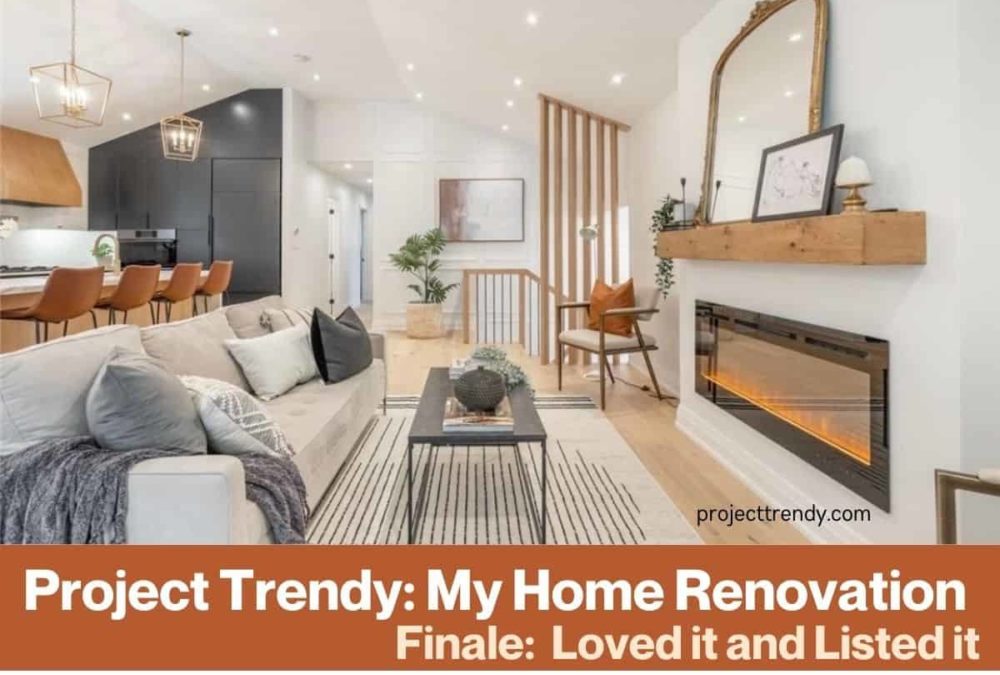
The Living Room. We added the fireplace feature with that beautiful natural wood mantle, tonnes of pot lights and light oak hardwood floors.

Another view of the living room. You can see where the vault starts above the curtain rod.

This is my favorite view of this room. You can see how open the space is, the amazing vault and the unique design for the kitchen cabinetry. One big open space.

The Dining Room. Once upon a time there were walls that separated the sad little dining room from the living room and kitchen. We said no more! Let’s knock ’em down and resuce that dining room and that we did. Now it thrives happily in this entertainer’s home.

Another view of how the dining room is thriving in it’s big beautiful space.

And here you all go…the BEFORE kitchen photos. Do you think we gave it a split second thought to keep those cabinets and appliances? Umm that’s a hard no! No judgment if you would have.

The NEW Kitchen! So many amazing things went into this space: we chose 3 colours (White, Soot (really dark navy) and a natural stain wood), we mixed up the style of cabinets (new shaker panel and flat panel), we added a 8ft island with a fluted wood feature on the one side, we did 2 different quartz counter tops (the vein style on the waterfall island and a plain white for the back counter), updated the lighting (added a light valence under the cabinets), I did a scaolloped backsplash,we added high end appliances (panelled fridge and dishwasher, Dacor oven built-in and Dacor gas cooktop and of course a wine fridge). We even put in a huge 36″ sink. Absolutely a true transformation!

The Old Bathroom. So this was a fun one! We took this bathroom and created 2!! We split it in half and stole 1ft from the kitchen and we made a beautiful main bath and below you will see the primary ensuite.
I had fun with bathrooms. For the main bath I put in a fun tile, a custom 54″ green vanity (ocean tropics was the colour), a simple 2×8 white tile for the tub surround. It gave me a very art deco vibe! So I added a oval mirror and even spray painted the light fixture to make it two-tone.

Primary Ensuite. To make this happen we took out the closet of the bedroom and the back half of the old bathroom. It’s incredible when you can re-invent a space.
I kept the primary ensuite classy with a clean Eden Statuary chevron tile and a similar huge porcelain wall tile. I paired that with a simple navy vanity and a gold arch mirror and light fixture (which you can’t see). It was very spacious and beautiful.

The Primary Room. This originally wasn’t the primary bedroom. But since it was similar in size and I was able to create the ensuite with this room, it was now upgraded to the primary.

The Primary Bedroom. With this view, you can see the old closet which we took to create the ensuite [If you paid attention to the bathroom photo, you can peep the box of the closet in the old bathroom. We took that plus where the toilet was and created that beautiful ensuite].

The Primary Closet. Since we removed the old closet, we had to put a new one in. So we took some space from the original primary bedroom next door and created a new bigger closet (with a closet orgnaizer inside).

The Second Bedroom. This was the original primary bedroom that we stole some space from (to make the new primary closet), but thanfully since this room was big enough it wasnt a big deal. This room fits a queen and a dresser comfortably and has a decent closet. I love when things work out!

The Third Bedroom. Kept it the same design. This room actually has a lot of space.

The Linen Closet. I couldn’t leave a space untouched! So I added a cute peel and stick wallpaper to elevate what was once boring closet to a fun and trendy space.

The Stairway Downstairs. Look at how we opened that space below! Quick shop talk for a sec- ya’ll that transition on the top step (tile to wood) looks amazing (my husband is gold)! Also I loved how much the hardwood matched our vinyl planks downstairs (I made it a point to hunt down a close match). Come on downstairs to see the rest…

The Mudroom. How cute is this?!! I absolutely loved the wall decals I did. It was so simple to put up and added so much to the space. We also added shoe storage under the staircase (why leave it an empty box when you can utilize it, right?!). I also put in some wall cabinets, shelves and cute wood hooks to provide storage.

So another creative space. That next room which was once a basement kitchen became 3 spaces: a second pantry, a bedroom/yoga room and a open office space (all of which I staged myself including the mudroom).

Another view of that old basement kithcen room becoming 3 spaces.

Second Pantry. The old basement kitchen had access to the crawl space, so I included that door inside the new pantry. I added some fun wallpaper and a large fridge/freezer plus shelving on both sides of the wall, which now will allow for storage of extra food, dishware and small appliances.

Yoga Room/Bedroom. So that old basement kitchen space allowed us to create another bedroom space (which I staged as a yoga room). We added an 8ft closet, which was amazing! The space already had tons of light (thanks to the huge windows- the home is a raised bungalow so it doesn’t feel like a basement).

Lower Bedroom. We kept this layout the same but added a closet and updated the electrical panel door (as well as the electrical for the whole home)

The Laundry Room. The first picture shows the view to the lower bedroom, which the laundry is located beside. Seriously take in that before view. Now go look at the after.

Hello Laundry Room! It is like a dream. That beautiful mint green is to die for (Blue Grass to be exact). I made this laundry room, so that I wouldn’t hate doing laundry. Here’s hoping the new owners love it just as much as I do (I had fun staging this room). Also, how incredible is that HUGE barn door with a chevron pattern?!

I also added some fun extras to the space. A hidden pop down ironing board and some pop down wall drying racks.

The Mechanical Room. It was a must for me to close it off into it’s own room. We upgraded the furance and water heater. We added some vinyl planks and some shelving and voila, it’s not stunning but it’s clean and purposful.

The Hallway Downstairs. It looks so much cleaner and upscale. I previously showed you the view to the secret wine room with the door closed (check it out again if you would like-under heading Cleaning Up and Final Touches- the panelled door was awesome and handmade by my husband and his friend)

The Lower Bathroom. We actually kept the layout the same, since it was a big bathroom. We just need to open up the old shower space. I added some fun tiles and a beautiful fluted wood vanity plus a fun hex mirror and a linear light (which was hard to find in such a small size-but I did find one in gold-so I had to spray paint it black).

Lower Bathroom. So like I mentioned we kept the layout the same, but can you believe what a difference the glass makes?!! This bathroom feels so much bigger!!
I went with a contrast tile colour in the shower, white subway tile and black hex floor. I wanted black grout for the wall tile but my husband wouldn’t let me-so white grout it was for both wall and floor.
If your wondering why the water controller is on the other wall, it was so you don’t get soaked when turning on the water (and testing the temp).

The Old Cellar. Creepy, smelly and uneven best describes that space. Check out the transformation below.

The Wine Room. So we turned the old cellar into a secret wine room.
The black panelled door pops open when you push it and you enter into a dark but relaxing space. I added some gold track lighting and a gold bar wall shelf to hold glasses and other liquors (not pictured). I hung some green velvet curtains and added gold tassels and that lion door knocker to fully create the vibe. Also behind the curtain, I hid a sandalwood room diffuser, the smell really creates the right ambience.

The Rec Room. First off, check out that amazing fireplace wall. Love love!! When I realized I couldn’t fit a TV above the fireplace I decided to do a unqiue feature wall. I found an inspo pic and I searched everywhere to find the right gas fireplace and even the right style of cut wood (I wanted rollies not the big wood chucks). I am truly in love with that fireplace feature. Also that big picture frame is actually our TV (we used it for staging).

The Rec Room. A couple more view points of the transformed space.

The Rec Room Bar. This view from the before and after is crazy! The after is just so open and bright and there is no waste of space.
We decided to add a bar/kitchenette to the rec room especially for those with extended family or friends who come and stay for awhile (there’s a beverage center, 24″ electric cooktop and 24″ black granite sink).

The Rec Room Bar/Kitchenette. I was inspired by a pic I saw on Instagram but took my own spin on it. It took me a few samples of paint to pick the right blue and oh was it the right blue (whipple blue for those wondering)! I love it! I decided to go with a wood chevron countertop and black sink, black cooktop and a black, steel and wood beverage center.
The arch was a mission to make (found a local C&C guy), we painted it white, then added some valence lighting which really made the handmade white irridescent tiles pop. The black and gold textured handles were perfection with this whole look. So happy with how it all turned out.

The Backyard. It may not seem like we did much but believe me we did. We painted all the siding to a grey/brown colour (including the shed). We decided to remove the large shrubs between the concrete pad and grass (that gave us 4ft of space). We removed an old dying tree and some dead cedars at the back and repalced them with healthy new cedars. The yard looks soo much bigger.

The Backyard. Some other things we did to transform this space was upgraded the doors (the black really pops off the red brick). We painted the concrete a dark grey, I re-planted some green boxwoods instead of flowers (to modernize the garden). We also added some outdoor potlights around the house and shed plus some string lights and a TV mount. Now the outdside is just as re-freshed as the inside.
Let me know what you think of the transformation in the comments below and check out my Facebook and Instagram for tags on some of the items we used in the house. Thanks again!